Create your own WordPress site: The 5 minute setup
Are you thinking about building your own website but feel overwhelmed by all the technical stuff? Don’t worry, you’re in the right place. WordPress makes it super easy for anyone to create a website—no coding skills required.
But why WordPress? Well, it’s the most popular platform for websites. In fact, over 40% of all websites on the internet use WordPress. It’s flexible, customizable, and perfect for almost any type of site—whether you’re starting a blog, launching an online store, or just want a simple portfolio.
About WordPress
Who is WordPress for?
Pretty much anyone! WordPress works for bloggers, small business owners, freelancers, and even large companies. Whether you’re just starting or growing a business, WordPress is powerful enough to handle your needs.
What do you need to get started?
To kick things off, you’ll need a couple of things: a domain name (that’s your website’s address) and web hosting (where your site will live online). After that, you can install WordPress in just a few clicks—and I’m going to show you exactly how.
Where might you need help from a pro?
While WordPress is user-friendly, sometimes it’s helpful to get a pro involved. If you need a more complex setup, like an online store, or want a custom design, working with a developer can save you a lot of time and headaches.
Now that you know why WordPress is such a great choice and what you need, let’s jump into the fun part—setting up your site!
The 5-Minute WordPress Setup Guide
Ready to get your WordPress site up and running? Let’s walk through the process step by step. Don’t worry—it’s quicker than you think!
Step 1: Choose a Domain Name and Hosting
First things first, you need a domain name (your website’s address) and a place to host it (web hosting). There are a ton of hosting providers out there, but I recommend Bluehost, HostGator, or Hostinger because they make it super easy to install WordPress.*1
If you’re not sure which host to go with, check out our post on choosing a hosting provider for your WordPress website. We’ve explained their easy one-click setup guides and compared them to help you make the best choice.

Keep your domain name short, easy to remember, and related to what your site is about.
Most hosting providers offer packages that include a free domain for the first year, so you’ll be ready to go once you sign up. After picking your domain, your hosting account is ready to go!
Step 2: Install WordPress via One-Click Install
Now that you’ve got your hosting and domain ready, it’s time to install WordPress. There are two main ways to do this: using a One-Click Install (most common and easiest) or Manual Installation (for those who prefer to have more control or whose host doesn’t offer one-click).
Option 1: One-Click Install
Most hosting providers make it super easy to install WordPress with just a few clicks. If you’re using Bluehost, HostGator, or Hostinger, they offer a simple one-click install right in your hosting dashboard.
Here’s how to do it:
- Log in to your hosting account.
- Look for the WordPress or One-Click Install option in your dashboard or cPanel.
- Click through the prompts and fill in a few basic details like your site name and admin login information.
- Click “Install” and let the system do the work!
Within a few seconds, WordPress will be installed, and you’ll be given a link to log into your new website.
Option 2: Manual Installation
If your host doesn’t offer a one-click install, or if you want more control over the process and like knowing exactly what’s happening under the hood, manual installation is the way to go.
Here’s how to manually install WordPress:
- Download WordPress:
Head over to wordpress.org and download the latest version of WordPress. - Upload the WordPress Files to Your Server:
You can upload the WordPress files using either an FTP client (like FileZilla) or your hosting provider’s file upload feature.- If you’re using one of our recommended hosting providers—Bluehost, HostGator, or Hostinger—you’ll have access to a file upload section in your control panel. For Bluehost and HostGator, look for the File Manager in your cPanel. If you’re using Hostinger, you’ll find this in the File Manager section of your hPanel.
- Once in the file manager, upload the WordPress files into the public_html directory (or the folder your host specifies for your website).
- Create a Database:
Next, you’ll need to set up a database to store all your site’s content. Here’s how to do that on our recommended hosts:- For Bluehost and HostGator, head to MySQL Databases in the cPanel.
- For Hostinger, go to the Databases section in the hPanel.
- Follow these steps:
- Step 1: Create a New Database
Find the “Create New Database” section, enter a name for your database, and click “Create.”
Example:mywordpressdb - Step 2: Create a Database User
Scroll down to the “MySQL Users” section, where you’ll create a new user. Choose a username and a strong password, then click “Create User.”
Example:wpuser - Step 3: Grant Privileges to the User
Once the user is created, you need to link the user to your new database. Under the “Add User to Database” section, select the newly created user and the database from the dropdowns and click “Add.”On the next screen, you’ll be asked to grant privileges to the user. Check All Privileges (or at least, the ones needed likeSELECT,INSERT,UPDATE, etc.), then click “Make Changes.” This gives the user full access to the database, which is necessary for WordPress to function properly.
- Step 1: Create a New Database
- Be sure to save your database name, username, and password—you’ll need them in the next step!
- Run the WordPress Installation Script:
- Once the files are uploaded and the database is ready, go to your website’s URL (e.g.,
yourdomain.com). - WordPress will detect that it hasn’t been installed yet and guide you through a setup wizard.
- You’ll be asked to input your database details (the ones you saved earlier).
- After that, hit “Run the Install,” and you’re all set!
- Once the files are uploaded and the database is ready, go to your website’s URL (e.g.,
Step 3: Get to Know Your WordPress Dashboard

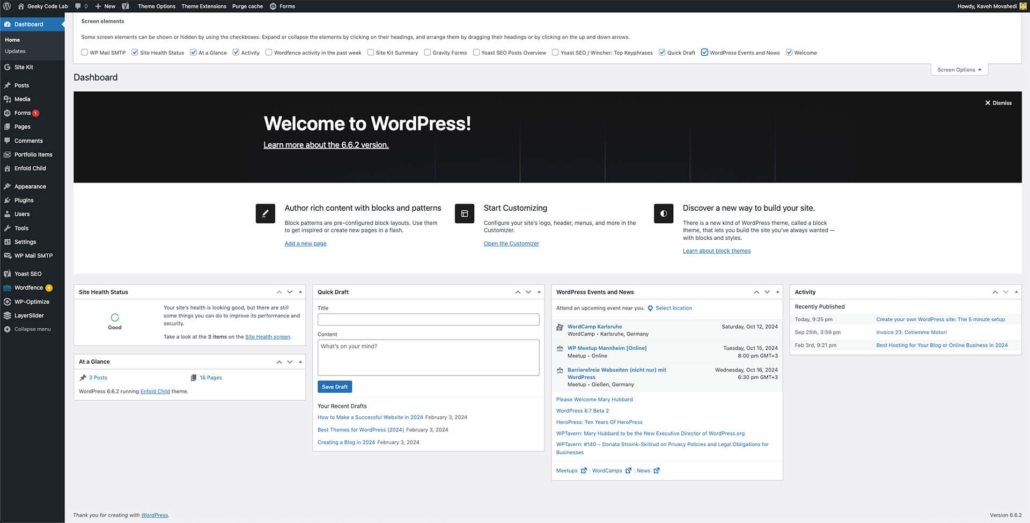
Once WordPress is installed, you’ll be able to log into your website’s admin area (aka the WordPress Dashboard) by visiting yourdomain.com/wp-admin. Enter the username and password you set up during installation, and you’ll be taken to the heart of your new WordPress site.
The WordPress Dashboard is where you’ll manage everything from creating pages and posts to adjusting your website’s settings. Let’s take a quick tour of two key areas you’ll want to check out right away:
General Settings
After logging in, head to the left-hand sidebar and click on Settings > General. This page is where you can fine-tune the basic details of your site:
- Site Title and Tagline: Choose how your site is named and what tagline appears with it.
- URL Settings: Make sure the WordPress Address (URL) and Site Address (URL) are set correctly. These should both show your domain, like
https://yourdomain.com. - Time Zone, Date, and Time Format: Set your time zone so your posts display at the correct time.
You can also adjust other details like your email address and language here.
Permalinks
Next, click on Settings > Permalinks in the sidebar. Permalinks are the URLs for your posts and pages, and choosing the right structure is important for SEO and user-friendliness.
- The default URL structure might not look clean (something like
yourdomain.com/?p=123). - I recommend choosing Post name as your permalink structure. This makes your URLs more readable, like
yourdomain.com/your-blog-post-title, which is better for both SEO and visitors.
After selecting Post name, scroll down and click Save Changes to lock in your new URL structure.
Getting familiar with your dashboard and these essential settings will help you start managing your WordPress site smoothly. From here, you can explore creating your first page or post, adding a theme, and setting up plugins!

Step 4: Choose a Theme and Install Essential Plugins
Now that you’ve got WordPress up and running, it’s time to give your site a fresh look and add some key features. WordPress makes this super easy by allowing you to install themes for design and plugins for functionality.
Choose and Install a Theme
A theme controls the overall design and layout of your site. WordPress comes with a few default themes, but there are thousands of free and premium themes available that can match any style or purpose.
Here’s how to pick and install a theme:
- Go to Appearance > Themes in your dashboard.
- Click on Add New, and you’ll see a gallery of free themes from the WordPress repository.
- Use the Feature Filter to search by layout, features, or subject (e.g., business, blog, portfolio).
- When you find one you like, click Install, and then click Activate to apply it to your site.
If you want more advanced options or premium themes with high customization, check out ThemeForest, one of the largest marketplaces for premium WordPress themes. They offer a wide selection of responsive themes suited for any niche.
We also recommend reading our post on the Best Page Builders and Responsive Themes to find more great theme options and page builder tools that can help you design your site without needing any coding skills.
Install Essential Plugins
Plugins are small pieces of software that add new features and functionality to your WordPress site. Whether you want to improve SEO, speed up your site, or enhance security, there’s a plugin for that!
Here’s how to install plugins:
- Go to Plugins > Add New in your dashboard.
- Search for the plugin you want, or explore the Featured, Popular, and Recommended sections.
- When you find one you want, click Install Now, then click Activate to enable it on your site.
Some essential plugins we recommend for any WordPress site include:
- Yoast SEO: Helps optimize your site for search engines.
- Wordfence: Adds an extra layer of security to protect your site.
- WP Super Cache: Improves your site speed by caching static versions of your pages.
- UpdraftPlus: Allows you to back up your site easily.
If you’re looking for premium plugins that can supercharge your site’s functionality, check out CodeCanyon. It’s a massive marketplace where you can find thousands of premium WordPress plugins that cover everything from advanced forms to e-commerce tools.
For more detailed plugin recommendations, check out our post on Boost Your WordPress Website’s Speed with Free CDN and Cache.

Step 5: Create Your First Page or Post and Set Up Navigation
Your WordPress site is almost ready to go live! Now it’s time to create your first piece of content, whether that’s a blog post or a static page, and set up navigation so your visitors can easily find their way around.
But before we dive into creating content, let’s clear up some common confusion: What’s the difference between a page and a post?
Pages vs. Posts: What’s the Difference?
One of the most frequent questions new WordPress users ask is, “Should I create a page or a post?”
- Pages are static and timeless. They’re perfect for content that won’t change often, like your homepage, “About Us,” or “Contact” pages. Pages aren’t organized by date or categories, and they don’t show up in your blog feed. Think of pages as the pillars of your site, providing essential information for your visitors.
- Posts, on the other hand, are dynamic and organized by date. These are perfect for blog entries, news updates, or any content that’s regularly updated. Posts can be categorized and tagged to help organize your content, and they show up in your blog feed in reverse chronological order (newest first). Posts are also great for content marketing, helping you attract traffic and engage readers.
Not sure which to use? Here’s a quick guide:
- Use pages for permanent information (homepage, service pages, privacy policy, etc.).
- Use posts for blog entries, announcements, and any content that benefits from being dated and categorized.
Still unsure? Check out our post on Creating a WordPress Blog where we dive deeper into posts, categories, tags, and how to leverage them for content marketing.
Creating a Page
If your site is more focused on static content (like a business site or portfolio), you’ll probably want to start by creating a page. Here’s how:
- Go to Pages > Add New in your dashboard.
- Give your page a title (e.g., “Home,” “About Us,” or “Services”).
- Use the content editor to add text, images, and other media. WordPress now uses the Block Editor (also called Gutenberg), which makes it super easy to design your page with drag-and-drop blocks.
- When you’re happy with your content, click Publish to make the page live.
If you’re not ready to go live yet, you can save your work as a draft by clicking Save Draft.
Creating a Blog Post
If your site will feature regular blog content, here’s how to create your first post:
- Go to Posts > Add New in your dashboard.
- Give your post a title (this will become the headline).
- Use the Block Editor to write your content and add media like images or videos.
- Choose a category or tags from the options on the right (this helps organize your posts).
- When you’re ready, hit Publish to make your post live.
Set Up a Navigation Menu
Once you’ve created some content, the next step is to set up a navigation menu to help visitors find their way around your site.
Here’s how to do that:
- Go to Appearance > Menus in your dashboard.
- Click Create a New Menu, give it a name (e.g., “Main Menu”), and click Create Menu.
- In the left-hand panel, you’ll see a list of your pages and posts. Select the ones you want to add to the menu, then click Add to Menu.
- Drag and drop the items in the order you want them to appear in the menu.
- Under Menu Settings, choose where the menu will appear (usually “Primary Menu” for the main navigation).
- Click Save Menu to make it live.
This should give your site a solid foundation with your first piece of content and easy-to-use navigation. You’re one step closer to going live!

Step 6: Review, Optimize, and Launch Your Site
Congratulations! You’ve built your WordPress site from the ground up. Before you hit that “launch” button, let’s make sure everything is in tip-top shape and optimized for your audience.
Review Your Content
Take a moment to go through all the pages and posts you’ve created. Check for:
- Typos and Grammar: Proofread your content to ensure it’s clear and free from mistakes.
- Images: Make sure all images are properly sized and alt tags are filled out for better accessibility and SEO.
- Links: Click on all internal and external links to ensure they work correctly.
Optimize for SEO
Now it’s time to make sure your site is ready for search engines. Here are some key areas to focus on:
- Permalinks: Go to Settings > Permalinks and choose a structure that’s SEO-friendly, like “Post name.” This makes your URLs easy to read and understand.
- Meta Tags: Use your SEO plugin (like Yoast SEO) to add meta titles and descriptions for each page and post. This helps search engines understand what your content is about.
- Optimize Images: Use tools to compress images without losing quality, ensuring your site loads faster.
- Mobile Optimization: Check how your site looks on mobile devices. WordPress themes are usually responsive, but it’s good to double-check!
Launch Your Site
Once you’re satisfied with everything, it’s time to go live! Here’s how:
- If you were working on a staging site, migrate it to your main domain.
- If everything is set up on your live site, simply let your audience know you’re officially open for business!
Promote Your Site
After launching, don’t forget to promote your new site! Share it on your social media, email newsletters, and other platforms. The more people who know about it, the better!
Ongoing Maintenance
Launching your site is just the beginning! Regularly update your content, check for broken links, and monitor your site’s performance. Consider setting up a regular backup schedule to keep your site secure.
And there you have it! You’ve successfully created your own WordPress site in just a few simple steps. Remember, the world of WordPress is vast, and there’s always more to learn and explore. Keep an eye out for our upcoming posts, where we’ll dive deeper into topics like securing your WordPress site, choosing the best page builders and themes, and optimizing for SEO.
- Affiliate Disclaimer: Some of the links on this page are affiliate links, which means if you click through and make a purchase, we earn a small commission—at no extra cost to you. These commissions help us keep creating free, helpful content for you, and we only recommend products we truly believe in. ↩︎


Leave a Reply
Want to join the discussion?Feel free to contribute!