Geeky Code Lab
  • Home
  • Services
    • Digital Marketing
    • Website and Web App Development
    • WordPress Websites
    • Mobile App Development
    • UI/UX Design
    • Graphic Design
  • Blog
  • Team
  • Contact
  • Menu Menu
Best Page Builders and Responsive Themes for WordPress

Best Page Builders and Responsive Themes for WordPress

in WordPress

Finding the best page builder and responsive theme for WordPress can be overwhelming, especially with so many options out there. In 2025, the right tools are more important than ever for building a fast, SEO-friendly, and user-focused site. Your choice of a page builder and theme doesn’t just affect the look of your site—it impacts speed, mobile responsiveness, and search engine rankings, which are key for driving traffic and keeping users engaged.

In this guide, we’ll cover the top page builders and themes for WordPress, from the built-in Gutenberg editor to powerful third-party builders like Elementor and WP Bakery. We’ll also explore popular responsive themes, including Enfold and Flatsome, looking at each option’s strengths and weaknesses and comparing them on speed, SEO, and web vitals performance.

At the end, you’ll find pros and cons for each tool to help you decide which page builder or theme is right for your WordPress site. Whether you’re a blogger, an e-commerce owner, or building a corporate site, this guide will help you choose tools that will help you rank high, load fast, and create a great user experience.
Gutenberg: Fast, Easy, and Powerful WordPress Page Builder

Gutenberg Editor and Compatible Themes

The Gutenberg editor is WordPress’s built-in page builder, introduced to provide a more flexible and user-friendly way to create content. Instead of relying on a traditional text editor, Gutenberg uses content blocks—pre-built sections for text, images, videos, and more. This block-based approach allows users to design pages with more control over layout and design without needing custom code.

Gutenberg’s biggest advantage is its speed and simplicity. Since it’s part of WordPress’s core, it’s inherently optimized to work well across most themes, making it a great choice if you’re focused on performance. Unlike third-party builders, Gutenberg doesn’t require additional plugins or heavy add-ons to get started, so it typically results in faster load times and fewer compatibility issues.

For best results with Gutenberg, pairing it with a theme designed for blocks is ideal. Here are a few themes optimized for Gutenberg that offer excellent speed, mobile responsiveness, and a lightweight setup for SEO:

  • GeneratePress: Known for its speed and simplicity, GeneratePress is a lightweight theme that keeps things minimal. It’s compatible with Gutenberg blocks and is a great choice if you’re aiming for fast load times and solid SEO performance.
  • Neve: Neve is a responsive and highly customizable theme built for Gutenberg, with a focus on mobile speed. It’s optimized for SEO and has built-in features for e-commerce, making it versatile for different site types.
  • Astra: Astra is a popular choice for users who want both flexibility and performance. It’s fully compatible with Gutenberg and offers tons of starter templates, so you can easily set up a site for various purposes, from blogging to business.
  • Hello Elementor: Although originally designed for Elementor, Hello Elementor is minimalistic and works well with Gutenberg if you want a barebones theme to build on.

Ideal Use Cases for Gutenberg:

  • Bloggers and content-focused sites needing fast load times and simple layouts
  • Business sites that require basic layouts and minimal custom design
  • Developers seeking a lightweight, bloat-free site with simple customization options

Pros and Cons of Gutenberg:

  • Pros: Lightweight and fast, easy to use for beginners, wide range of block plugins, fully WordPress-integrated
  • Cons: Limited design flexibility, fewer pre-made templates, customization options less extensive than third-party builders

Using Gutenberg keeps your website lean, ideal for users who prioritize speed and simplicity over advanced design capabilities. With compatible themes like Astra and GeneratePress, Gutenberg can be the backbone of a high-performing website without the additional load of an external page builder.
Elementor: A Powerful, Flexible Page Builder for WordPress

Elementor: A Powerful, Flexible Page Builder

Elementor is one of the most popular third-party page builders for WordPress, especially favored for its drag-and-drop editor and extensive design options. With Elementor, you can create custom layouts, add interactive elements like sliders and forms, and apply animations without writing any code. This makes it a fantastic tool for users looking to create visually engaging websites.

It’s important to note that Elementor is a page builder, not a theme. To use it effectively, you’ll need a theme that’s compatible with Elementor, such as Hello Elementor (a minimal free theme created by the Elementor team for speed) or WoodMart (a theme popular for e-commerce sites). Choosing the right theme is essential to ensure fast loading times and compatibility with all of Elementor’s design features.

Elementor’s flexibility comes with a trade-off. While it offers nearly limitless customization options, each element and widget you add can contribute to page weight, which can slow down load times and impact Core Web Vitals scores. This is especially true if you use additional Elementor add-ons or third-party plugins, as these often load extra assets, affecting page speed and SEO. If speed and SEO are priorities, it’s a good idea to monitor your use of widgets and consider caching plugins to offset any performance issues.

Ideal Use Cases for Elementor:

  • Small businesses needing a unique, branded look without hiring a designer
  • Creative professionals who want a high degree of visual control
  • E-commerce sites that benefit from advanced product and landing page layouts

Pros and Cons of Elementor:

  • Pros: Highly customizable, easy-to-use drag-and-drop interface, lots of design options and templates
  • Cons: Slower page load times if heavily customized, can require extra optimization for SEO, premium features behind paywall

With Elementor, you’re choosing a page builder that prioritizes design freedom. But to keep your site fast, remember to balance customization with optimization and avoid overloading pages with too many widgets.

WP Bakery: Versatile with a Classic Interface

WP Bakery: Versatile with a Classic Interface

WP Bakery is a long-standing favorite among WordPress users, known for its intuitive drag-and-drop editor and extensive customization options. WP Bakery offers both frontend and backend editing, giving users more control over how they design their pages. It’s packed with content elements, including customizable grids, sliders, and animation effects, making it a great choice if you want more control over layout without needing advanced coding skills.

WP Bakery isn’t a theme, so you’ll need a compatible theme to get the best results. It pairs well with popular multipurpose themes like Enfold or Bridge, which offer pre-designed templates and layouts optimized for WP Bakery.

While WP Bakery offers many of the same benefits as Elementor, it’s often a bit lighter on system resources, which can help with page speed. However, the sheer number of features and customization options may lead some users to over-customize their pages, which can still impact page load times and SEO performance if not managed carefully.

Ideal Use Cases for WP Bakery:

  • Businesses that need a custom-designed site with both frontend and backend editing
  • Agencies working with clients who need control over page layout without compromising on design
  • Portfolio sites where unique layouts and visual appeal are essential

Pros and Cons of WP Bakery:

  • Pros: Flexible editing options (frontend and backend), rich set of elements and templates, long-standing reputation in WordPress community
  • Cons: Can slow down sites if overused, premium plugin costs for advanced features, slightly steeper learning curve than some other builders

For users looking to create unique layouts without sacrificing frontend editing capabilities, WP Bakery is an excellent choice. Just be mindful of loading speeds and avoid adding too many elements, especially if SEO is a key goal.
WP Bakery: WordPress Page Builder Plugin

Visual Composer: Modern Design with Responsive Features

Visual Composer is a modern, all-in-one page builder designed for users who want both design flexibility and ease of use. With Visual Composer, you get a drag-and-drop editor with over 300 elements, templates, and content blocks. Its wide range of customization options allows you to create visually appealing pages with responsive designs, which automatically adapt to different devices and screen sizes. Visual Composer also offers frontend and backend editing to give you complete control over the look and feel of your website.

Like other page builders, Visual Composer isn’t a theme, so pairing it with a theme optimized for the builder is essential. Themes like Total and Salient work well with Visual Composer, offering a cohesive experience that blends theme features with Visual Composer’s page-building capabilities.

One standout feature of Visual Composer is its built-in SEO optimization tools. While all page builders can impact SEO based on load times and code quality, Visual Composer has streamlined its structure to be lighter on resources. However, keep in mind that adding too many animations or elements can still lead to slower loading times, which may affect your Core Web Vitals scores.

Ideal Use Cases for Visual Composer:

  • Businesses and portfolios needing creative control with responsive design
  • Agencies that prioritize SEO-friendly designs for clients
  • Non-technical users who appreciate a wide range of pre-made templates and blocks

Pros and Cons of Visual Composer:

  • Pros: Large library of elements and templates, responsive design options, built-in SEO optimization
  • Cons: Potential for slower speeds with excessive elements, premium features require a subscription, may feel overwhelming for beginners due to its extensive options

Visual Composer offers a balanced approach for users who want a professional-looking site without sacrificing flexibility. If SEO and mobile responsiveness are priorities, Visual Composer’s optimization features make it a strong contender among page builders.

Divi: Responsive Theme for WordPress by Elegant Themes

Divi: Highly Customizable with a Visual Focus

Divi by Elegant Themes is one of the most popular WordPress themes and page builders due to its visual, drag-and-drop design interface and extensive customization options. Unlike Gutenberg, Divi is an all-in-one theme and builder, providing both the design structure and the builder tools in one package. This combination makes it a powerful choice for users who want complete control over their site’s look and feel without needing coding skills.

Divi Builder offers an intuitive, real-time editing experience with a variety of content modules—such as sliders, testimonials, pricing tables, and galleries—allowing users to build complex layouts easily. It also comes with hundreds of pre-made templates and layout packs across different industries, making it faster to set up and customize a website.

However, Divi’s extensive features come with some trade-offs in terms of performance. While it’s highly customizable, Divi can be slower than other page builders, especially if you add a lot of elements and animations. To maintain speed, it’s essential to optimize Divi sites by reducing the number of plugins and animations and considering additional caching or a CDN to handle the load.

Ideal Use Cases for Divi:

  • Small businesses and agencies that need a high level of design flexibility for unique layouts
  • Portfolios and creative sites looking to showcase visual content with polished design elements
  • Developers who want extensive theme options and CSS controls for deeper customization

Pros and Cons of Divi:

  • Pros: High design flexibility, includes both theme and builder, a vast library of templates, ideal for visually rich sites
  • Cons: Performance can be slower than lighter themes/builders, steeper learning curve, requires optimization for faster load times

With Divi, you’re getting a powerful, all-in-one solution that’s ideal for users focused on highly customized design. However, to maximize speed and SEO, you’ll want to carefully monitor performance and optimize where possible.

Enfold: Responsive WordPress theme with Avia Layour Builder

Enfold: Simplicity and Stability with the Avia Layout Builder

Enfold stands out as a reliable, easy-to-use theme that includes its own page builder, the Avia Layout Builder. Unlike many third-party builders, Avia is integrated directly into Enfold, which can streamline performance and reduce compatibility issues. The builder provides a drag-and-drop interface with essential design elements, allowing users to create clean, professional layouts without added complexity.

Enfold is a fantastic option for users who prioritize simplicity over flashy designs, as it avoids excessive animations and features that could slow down the site. This makes it ideal for users who want a stable, well-coded theme that’s easy to maintain and optimize for SEO.

Additionally, Enfold is very developer-friendly. The theme is well-documented, and the developers offer strong support, making it easier to customize elements or add advanced functionality if needed. For users with coding experience, Avia’s code structure is accessible and modifiable, giving developers more control than many other page builders allow.

Ideal Use Cases for Enfold:

  • Small businesses and personal sites that need a stable, easy-to-maintain theme
  • Developers who want to customize a theme with well-documented support and code flexibility
  • Corporate sites where simplicity, speed, and SEO are prioritized

Pros and Cons of Enfold:

  • Pros: Lightweight and fast, easy-to-use Avia Layout Builder, highly customizable for developers, excellent documentation and support
  • Cons: Limited animations and design effects, fewer advanced widgets compared to plugins like Elementor, some customization requires coding skills

For anyone seeking a simple, robust solution that performs well on Core Web Vitals, Enfold offers a balance of ease and customizability. Its dedicated support team and extensive documentation make it a favorite among developers who want a theme that they can easily adapt to different needs.

Enfold templates and samples
Flatsome: Responsive WooCommerce theme with flexible page builder

Flatsome: E-commerce Excellence with WooCommerce

Flatsome is a top choice for building e-commerce websites in WordPress, thanks to its deep integration with WooCommerce. Designed specifically for online stores, Flatsome combines fast loading speeds, responsive layouts, and an intuitive UX Builder that makes creating a sleek storefront simple for both beginners and experienced users.

Flatsome’s UX Builder is similar to other page builders, with a drag-and-drop interface tailored for creating dynamic e-commerce layouts. It includes pre-made templates for product pages, checkout, and cart experiences, as well as highly customizable features like product grids, sliders, and sale banners. This setup allows users to create a polished online store that feels cohesive and user-friendly.

Flatsome also supports extensive WooCommerce features, making it easy to add and manage products, set up promotions, and enhance the shopping experience. The theme is optimized for speed and SEO, helping online stores perform well in search engine rankings without compromising on design.

Ideal Use Cases for Flatsome:

  • E-commerce sites that need WooCommerce compatibility and a polished look
  • Online stores prioritizing fast load times and a seamless user experience
  • Businesses with large product catalogs needing customizable product and checkout pages

Pros and Cons of Flatsome:

  • Pros: Fully WooCommerce-compatible, UX Builder for easy customization, fast loading and SEO-friendly, excellent for creating unique product and checkout pages
  • Cons: Primarily suited for e-commerce, fewer non-store templates, advanced features behind paywall

With Flatsome, you’re getting a theme built specifically for WooCommerce. Its e-commerce-focused tools, coupled with its emphasis on speed and SEO, make it an excellent choice for users looking to build an efficient and attractive online store.

Flatsome templates and samples

Verdict

Builder / ThemeProsCons
Elementor– Highly customizable with drag-and-drop functionality
– Large library of templates and widgets
– Extensive plugin support for added features
– Can be slow if overloaded with plugins
– Must install a compatible theme like Hello Elementor
WP Bakery– Suitable for beginners with simple drag-and-drop editor
– Widely compatible with various themes
– Interface can feel outdated
– Limited flexibility compared to modern builders
Divi– Combines theme and builder in one package
– Hundreds of layout packs and templates
– Can impact performance if unoptimized
– Steeper learning curve for new users
Visual Composer– Highly visual editor with front-end and back-end editing options
– Large library of templates, elements, and add-ons
– Compatible with a wide range of WordPress themes and includes responsive design features
– Performance can be slower with complex layouts
– Some advanced features and templates require premium add-ons
Gutenberg– Lightweight and built into WordPress core
– Fast, with minimal compatibility issues
– Limited design options compared to other builders
– Fewer templates and customization options
Enfold– Includes Avia Layout Builder, a user-friendly, drag-and-drop editor
– Excellent developer support and comprehensive documentation
– Highly customizable yet simple for beginners; ideal for fast, functional sites
– Not as visually dynamic as other builders like Elementor or Divi
– Fewer add-ons and templates compared to larger builders
Flatsome– Built specifically for WooCommerce
– Fast and SEO-friendly
– Primarily suited for e-commerce
– Fewer general-purpose templates
https://geekycodelab.com/wp-content/uploads/2024/11/best-wordpress-themes.jpg 430 1500 Kaveh Movahedi https://geekycodelab.com/wp-content/uploads/2024/07/logo-transparent.png Kaveh Movahedi2024-11-03 18:04:452024-11-04 17:42:33Best Page Builders and Responsive Themes for WordPress
WordPress Step by Step Installation Guide

Create your own WordPress site: The 5 minute setup

in WordPress

Are you thinking about building your own website but feel overwhelmed by all the technical stuff? Don’t worry, you’re in the right place. WordPress makes it super easy for anyone to create a website—no coding skills required.

But why WordPress? Well, it’s the most popular platform for websites. In fact, over 40% of all websites on the internet use WordPress. It’s flexible, customizable, and perfect for almost any type of site—whether you’re starting a blog, launching an online store, or just want a simple portfolio.

About WordPress

Who is WordPress for?

Pretty much anyone! WordPress works for bloggers, small business owners, freelancers, and even large companies. Whether you’re just starting or growing a business, WordPress is powerful enough to handle your needs.

What do you need to get started?

To kick things off, you’ll need a couple of things: a domain name (that’s your website’s address) and web hosting (where your site will live online). After that, you can install WordPress in just a few clicks—and I’m going to show you exactly how.

Where might you need help from a pro?

While WordPress is user-friendly, sometimes it’s helpful to get a pro involved. If you need a more complex setup, like an online store, or want a custom design, working with a developer can save you a lot of time and headaches.

Now that you know why WordPress is such a great choice and what you need, let’s jump into the fun part—setting up your site!

The 5-Minute WordPress Setup Guide

Ready to get your WordPress site up and running? Let’s walk through the process step by step. Don’t worry—it’s quicker than you think!

Step 1: Choose a Domain Name and Hosting

First things first, you need a domain name (your website’s address) and a place to host it (web hosting). There are a ton of hosting providers out there, but I recommend Bluehost, HostGator, or Hostinger because they make it super easy to install WordPress.*1

If you’re not sure which host to go with, check out our post on choosing a hosting provider for your WordPress website. We’ve explained their easy one-click setup guides and compared them to help you make the best choice.

Quick Tip

Keep your domain name short, easy to remember, and related to what your site is about.

Most hosting providers offer packages that include a free domain for the first year, so you’ll be ready to go once you sign up. After picking your domain, your hosting account is ready to go!

Step 2: Install WordPress via One-Click Install

Now that you’ve got your hosting and domain ready, it’s time to install WordPress. There are two main ways to do this: using a One-Click Install (most common and easiest) or Manual Installation (for those who prefer to have more control or whose host doesn’t offer one-click).

Option 1: One-Click Install

Most hosting providers make it super easy to install WordPress with just a few clicks. If you’re using Bluehost, HostGator, or Hostinger, they offer a simple one-click install right in your hosting dashboard.

Here’s how to do it:

  1. Log in to your hosting account.
  2. Look for the WordPress or One-Click Install option in your dashboard or cPanel.
  3. Click through the prompts and fill in a few basic details like your site name and admin login information.
  4. Click “Install” and let the system do the work!

Within a few seconds, WordPress will be installed, and you’ll be given a link to log into your new website.

Option 2: Manual Installation

If your host doesn’t offer a one-click install, or if you want more control over the process and like knowing exactly what’s happening under the hood, manual installation is the way to go.

Here’s how to manually install WordPress:

  1. Download WordPress:
    Head over to wordpress.org and download the latest version of WordPress.
  2. Upload the WordPress Files to Your Server:
    You can upload the WordPress files using either an FTP client (like FileZilla) or your hosting provider’s file upload feature.
    • If you’re using one of our recommended hosting providers—Bluehost, HostGator, or Hostinger—you’ll have access to a file upload section in your control panel. For Bluehost and HostGator, look for the File Manager in your cPanel. If you’re using Hostinger, you’ll find this in the File Manager section of your hPanel.
    • Once in the file manager, upload the WordPress files into the public_html directory (or the folder your host specifies for your website).
  3. Create a Database:
    Next, you’ll need to set up a database to store all your site’s content. Here’s how to do that on our recommended hosts:
    • For Bluehost and HostGator, head to MySQL Databases in the cPanel.
    • For Hostinger, go to the Databases section in the hPanel.
    • Follow these steps:
      • Step 1: Create a New Database
        Find the “Create New Database” section, enter a name for your database, and click “Create.”
        Example: mywordpressdb
      • Step 2: Create a Database User
        Scroll down to the “MySQL Users” section, where you’ll create a new user. Choose a username and a strong password, then click “Create User.”
        Example: wpuser
      • Step 3: Grant Privileges to the User
        Once the user is created, you need to link the user to your new database. Under the “Add User to Database” section, select the newly created user and the database from the dropdowns and click “Add.”On the next screen, you’ll be asked to grant privileges to the user. Check All Privileges (or at least, the ones needed like SELECT, INSERT, UPDATE, etc.), then click “Make Changes.” This gives the user full access to the database, which is necessary for WordPress to function properly.
    • Be sure to save your database name, username, and password—you’ll need them in the next step!
  4. Run the WordPress Installation Script:
    • Once the files are uploaded and the database is ready, go to your website’s URL (e.g., yourdomain.com).
    • WordPress will detect that it hasn’t been installed yet and guide you through a setup wizard.
    • You’ll be asked to input your database details (the ones you saved earlier).
    • After that, hit “Run the Install,” and you’re all set!

Step 3: Get to Know Your WordPress Dashboard

WordPress Dashboard

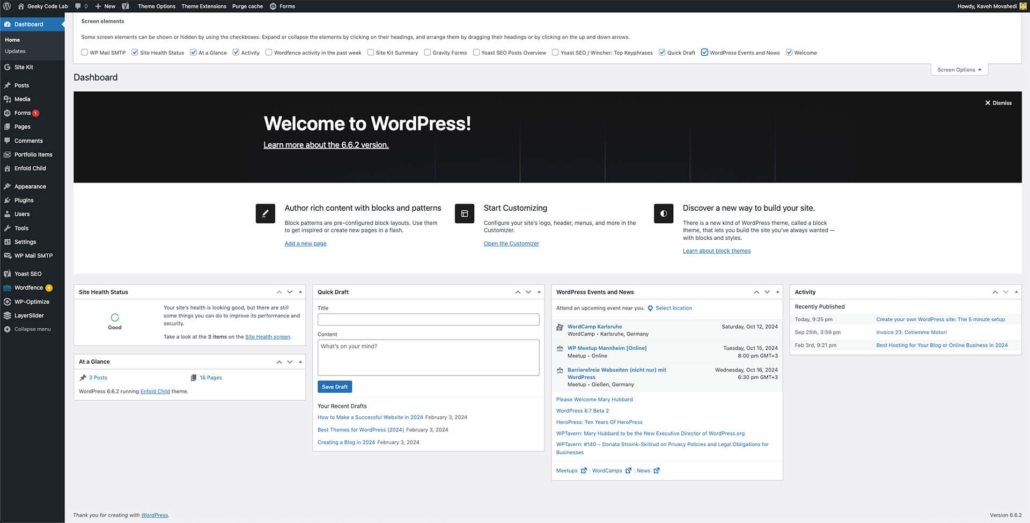
Once WordPress is installed, you’ll be able to log into your website’s admin area (aka the WordPress Dashboard) by visiting yourdomain.com/wp-admin. Enter the username and password you set up during installation, and you’ll be taken to the heart of your new WordPress site.

The WordPress Dashboard is where you’ll manage everything from creating pages and posts to adjusting your website’s settings. Let’s take a quick tour of two key areas you’ll want to check out right away:

General Settings

After logging in, head to the left-hand sidebar and click on Settings > General. This page is where you can fine-tune the basic details of your site:

  • Site Title and Tagline: Choose how your site is named and what tagline appears with it.
  • URL Settings: Make sure the WordPress Address (URL) and Site Address (URL) are set correctly. These should both show your domain, like https://yourdomain.com.
  • Time Zone, Date, and Time Format: Set your time zone so your posts display at the correct time.

You can also adjust other details like your email address and language here.

Permalinks

Next, click on Settings > Permalinks in the sidebar. Permalinks are the URLs for your posts and pages, and choosing the right structure is important for SEO and user-friendliness.

  • The default URL structure might not look clean (something like yourdomain.com/?p=123).
  • I recommend choosing Post name as your permalink structure. This makes your URLs more readable, like yourdomain.com/your-blog-post-title, which is better for both SEO and visitors.

After selecting Post name, scroll down and click Save Changes to lock in your new URL structure.

Getting familiar with your dashboard and these essential settings will help you start managing your WordPress site smoothly. From here, you can explore creating your first page or post, adding a theme, and setting up plugins!

Choose a WordPress Theme

Step 4: Choose a Theme and Install Essential Plugins

Now that you’ve got WordPress up and running, it’s time to give your site a fresh look and add some key features. WordPress makes this super easy by allowing you to install themes for design and plugins for functionality.

Choose and Install a Theme

A theme controls the overall design and layout of your site. WordPress comes with a few default themes, but there are thousands of free and premium themes available that can match any style or purpose.

Here’s how to pick and install a theme:

  1. Go to Appearance > Themes in your dashboard.
  2. Click on Add New, and you’ll see a gallery of free themes from the WordPress repository.
  3. Use the Feature Filter to search by layout, features, or subject (e.g., business, blog, portfolio).
  4. When you find one you like, click Install, and then click Activate to apply it to your site.

If you want more advanced options or premium themes with high customization, check out ThemeForest, one of the largest marketplaces for premium WordPress themes. They offer a wide selection of responsive themes suited for any niche.

We also recommend reading our post on the Best Page Builders and Responsive Themes to find more great theme options and page builder tools that can help you design your site without needing any coding skills.

Install Essential Plugins

Plugins are small pieces of software that add new features and functionality to your WordPress site. Whether you want to improve SEO, speed up your site, or enhance security, there’s a plugin for that!

Here’s how to install plugins:

  1. Go to Plugins > Add New in your dashboard.
  2. Search for the plugin you want, or explore the Featured, Popular, and Recommended sections.
  3. When you find one you want, click Install Now, then click Activate to enable it on your site.

Some essential plugins we recommend for any WordPress site include:

  • Yoast SEO: Helps optimize your site for search engines.
  • Wordfence: Adds an extra layer of security to protect your site.
  • WP Super Cache: Improves your site speed by caching static versions of your pages.
  • UpdraftPlus: Allows you to back up your site easily.

If you’re looking for premium plugins that can supercharge your site’s functionality, check out CodeCanyon. It’s a massive marketplace where you can find thousands of premium WordPress plugins that cover everything from advanced forms to e-commerce tools.

For more detailed plugin recommendations, check out our post on Boost Your WordPress Website’s Speed with Free CDN and Cache.

Setup WordPress with Pages, Posts and Menus

Step 5: Create Your First Page or Post and Set Up Navigation

Your WordPress site is almost ready to go live! Now it’s time to create your first piece of content, whether that’s a blog post or a static page, and set up navigation so your visitors can easily find their way around.

But before we dive into creating content, let’s clear up some common confusion: What’s the difference between a page and a post?

Pages vs. Posts: What’s the Difference?

One of the most frequent questions new WordPress users ask is, “Should I create a page or a post?”

  • Pages are static and timeless. They’re perfect for content that won’t change often, like your homepage, “About Us,” or “Contact” pages. Pages aren’t organized by date or categories, and they don’t show up in your blog feed. Think of pages as the pillars of your site, providing essential information for your visitors.
  • Posts, on the other hand, are dynamic and organized by date. These are perfect for blog entries, news updates, or any content that’s regularly updated. Posts can be categorized and tagged to help organize your content, and they show up in your blog feed in reverse chronological order (newest first). Posts are also great for content marketing, helping you attract traffic and engage readers.

Not sure which to use? Here’s a quick guide:

  • Use pages for permanent information (homepage, service pages, privacy policy, etc.).
  • Use posts for blog entries, announcements, and any content that benefits from being dated and categorized.

Still unsure? Check out our post on Creating a WordPress Blog where we dive deeper into posts, categories, tags, and how to leverage them for content marketing.

Creating a Page

If your site is more focused on static content (like a business site or portfolio), you’ll probably want to start by creating a page. Here’s how:

  1. Go to Pages > Add New in your dashboard.
  2. Give your page a title (e.g., “Home,” “About Us,” or “Services”).
  3. Use the content editor to add text, images, and other media. WordPress now uses the Block Editor (also called Gutenberg), which makes it super easy to design your page with drag-and-drop blocks.
  4. When you’re happy with your content, click Publish to make the page live.

If you’re not ready to go live yet, you can save your work as a draft by clicking Save Draft.

Creating a Blog Post

If your site will feature regular blog content, here’s how to create your first post:

  1. Go to Posts > Add New in your dashboard.
  2. Give your post a title (this will become the headline).
  3. Use the Block Editor to write your content and add media like images or videos.
  4. Choose a category or tags from the options on the right (this helps organize your posts).
  5. When you’re ready, hit Publish to make your post live.

Set Up a Navigation Menu

Once you’ve created some content, the next step is to set up a navigation menu to help visitors find their way around your site.

Here’s how to do that:

  1. Go to Appearance > Menus in your dashboard.
  2. Click Create a New Menu, give it a name (e.g., “Main Menu”), and click Create Menu.
  3. In the left-hand panel, you’ll see a list of your pages and posts. Select the ones you want to add to the menu, then click Add to Menu.
  4. Drag and drop the items in the order you want them to appear in the menu.
  5. Under Menu Settings, choose where the menu will appear (usually “Primary Menu” for the main navigation).
  6. Click Save Menu to make it live.

This should give your site a solid foundation with your first piece of content and easy-to-use navigation. You’re one step closer to going live!

Launch WordPress Website

Step 6: Review, Optimize, and Launch Your Site

Congratulations! You’ve built your WordPress site from the ground up. Before you hit that “launch” button, let’s make sure everything is in tip-top shape and optimized for your audience.

Review Your Content

Take a moment to go through all the pages and posts you’ve created. Check for:

  • Typos and Grammar: Proofread your content to ensure it’s clear and free from mistakes.
  • Images: Make sure all images are properly sized and alt tags are filled out for better accessibility and SEO.
  • Links: Click on all internal and external links to ensure they work correctly.

Optimize for SEO

Now it’s time to make sure your site is ready for search engines. Here are some key areas to focus on:

  1. Permalinks: Go to Settings > Permalinks and choose a structure that’s SEO-friendly, like “Post name.” This makes your URLs easy to read and understand.
  2. Meta Tags: Use your SEO plugin (like Yoast SEO) to add meta titles and descriptions for each page and post. This helps search engines understand what your content is about.
  3. Optimize Images: Use tools to compress images without losing quality, ensuring your site loads faster.
  4. Mobile Optimization: Check how your site looks on mobile devices. WordPress themes are usually responsive, but it’s good to double-check!

Launch Your Site

Once you’re satisfied with everything, it’s time to go live! Here’s how:

  • If you were working on a staging site, migrate it to your main domain.
  • If everything is set up on your live site, simply let your audience know you’re officially open for business!

Promote Your Site

After launching, don’t forget to promote your new site! Share it on your social media, email newsletters, and other platforms. The more people who know about it, the better!

Ongoing Maintenance

Launching your site is just the beginning! Regularly update your content, check for broken links, and monitor your site’s performance. Consider setting up a regular backup schedule to keep your site secure.

And there you have it! You’ve successfully created your own WordPress site in just a few simple steps. Remember, the world of WordPress is vast, and there’s always more to learn and explore. Keep an eye out for our upcoming posts, where we’ll dive deeper into topics like securing your WordPress site, choosing the best page builders and themes, and optimizing for SEO.

  1. Affiliate Disclaimer: Some of the links on this page are affiliate links, which means if you click through and make a purchase, we earn a small commission—at no extra cost to you. These commissions help us keep creating free, helpful content for you, and we only recommend products we truly believe in. ↩︎
https://geekycodelab.com/wp-content/uploads/2024/10/wordpress-installation-setup.jpg 430 1500 Kaveh Movahedi https://geekycodelab.com/wp-content/uploads/2024/07/logo-transparent.png Kaveh Movahedi2024-10-09 21:25:382024-10-09 22:13:26Create your own WordPress site: The 5 minute setup
Best Hosting for Your Blog or Online Business in 2024

Best Hosting for Your Blog or Online Business in 2024

in Hosting, Web Development, WordPress

Embarking on your online venture, be it a blog, a WordPress site, an online shop, or any other web application, can be both thrilling and overwhelming. You’ve got the ideas, but where do you start? Choosing the right hosting provider is your first step into the digital world, and we’re here to simplify the process for you. In this guide tailored for beginners, we’ll explore the best hosting options for your specific needs, making your journey into the online realm as smooth as possible. Let’s dive in and set the foundation for your digital success in 2024.

Understanding Hosting Types

Managed Hosting

Managed hosting is a service where the hosting provider takes care of the day-to-day technical aspects of server management. This includes tasks such as regular updates, security monitoring, and performance optimization. It’s an excellent option for those who want a hassle-free hosting experience without delving into the technical intricacies.

Shared Hosting

Shared hosting involves multiple websites sharing resources on a single server. It’s a cost-effective option, making it ideal for small to medium-sized websites with moderate traffic. However, shared hosting may lead to performance issues if neighboring sites experience high traffic.

VPS Hosting

Virtual Private Server (VPS) hosting offers a middle ground between shared and dedicated hosting. It provides a dedicated portion of a physical server, offering more control and resources than shared hosting. VPS hosting is suitable for websites with growing traffic and resource requirements.

Dedicated Hosting

Dedicated hosting provides an entire server exclusively for your website. This option is best for large websites with high traffic and resource-intensive applications. Dedicated hosting offers maximum control and customization but comes at a higher cost.

Cloud Hosting (AWS)

Cloud hosting, exemplified by AWS (Amazon Web Services), utilizes a network of virtual servers to deliver scalable and flexible hosting solutions. It’s known for its reliability, scalability, and pay-as-you-go pricing model. Cloud hosting is suitable for a wide range of applications, from small websites to large-scale enterprise solutions.

Data Center and Cloud Providers, AWS EC2 and shared hosting

Best Hosting Providers for 2024

In the ever-expanding world of web hosting, selecting the right provider is pivotal to the success of your online venture. Let’s dive into two key considerations for 2024:

Cloud Hosting on AWS – The Top Choice for Expertise and Flexibility

Why AWS

Amazon Web Services (AWS) stands out as our top recommendation for those who possess the technical expertise or are willing to hire someone to handle server setup and maintenance regularly.

Flexibility and Scalability

AWS offers unparalleled flexibility and scalability, allowing you to tailor your hosting environment precisely to your needs. It’s the go-to option for complex web applications and high-traffic websites.

Expertise Required

However, it’s crucial to note that leveraging AWS to its fullest potential requires technical know-how. If you or your team are well-versed in server management, AWS provides the tools for optimal customization and performance.

Shared Hosting – Navigating the Simplicity and Resource Constraints

Performance Paradox

Shared hosting often sparks intricate comparisons, but the reality is that performance differences are minimal. In a shared hosting environment, your website shares resources with other sites on the same server.

Resource Limitations

Your experience with shared hosting will primarily be shaped by the resources assigned to your account. This includes factors such as CPU, memory, and storage limits. Understanding these limitations is essential to manage expectations.

Control and Updates

Shared hosting providers may limit certain server configurations and services, affecting your ability to enable specific features. Additionally, the regularity of software updates, such as PHP versions and database software, is crucial for maintaining a secure and optimized environment.

Pathway to selecting a server and best hosting provider for your website or app

Choosing the Right Path

Choosing the right hosting provider is like picking the perfect outfit—it should fit just right and make you feel confident. Whether you’re diving into the complexities of AWS for tailored cloud hosting or keeping it straightforward with shared hosting, the key is to understand your needs.

Tailor to Your Needs

Consider your level of technical expertise, the complexity of your website, and your growth expectations when making a decision. Cloud hosting on AWS offers unparalleled customization, while shared hosting provides simplicity and cost-effectiveness.

Balance Cost and Performance

For those starting out, shared hosting can be a budget-friendly choice without compromising performance significantly. However, as your website grows, reassessing your hosting needs may lead you to explore more advanced solutions like cloud hosting.

Best Shared Hosting Providers

For shared hosting beginners, we recommend the straightforward experiences offered by Bluehost and HostGator. Bluehost brings a hassle-free WordPress integration, free SSL certificates, and reliable support. HostGator, a long-standing player, delivers on uptime, a user-friendly control panel, and budget-friendly plans.

They both provide tailored services for WordPress with support for latest version of PHP and MariaDB, the two main services that you need for your WordPress website, include an email server with your service with the option to use Google or Microsoft as your mail provider and offer cPanel the most popular server management software with a very easy to use interface.

Bluehost

Renowned for its seamless integration with WordPress, Bluehost offers a hassle-free experience for bloggers, entrepreneurs, and small businesses. With a one-click WordPress installation, free SSL certificates, and a robust customer support team available 24/7, Bluehost simplifies the shared hosting journey while ensuring your website stays secure and performs optimally.

HostGator

As a stalwart in the hosting industry, HostGator caters to a wide range of users with its diverse hosting plans. Whether you’re launching a personal blog or a dynamic e-commerce site, HostGator’s shared hosting options provide excellent uptime, an intuitive control panel, and responsive customer support. Their budget-friendly plans make them an ideal choice for those starting their online journey without compromising on quality.

What we do not recommend

Although we mentioned the differences are minimal when comparing shared hosting services, at least between the most famous providers. In our experience there is one exception: GoDaddy.

In 2024, GoDaddy does not allow you to install a free SSL certificate, and charges you a high price for their own SSL certificates compared to other providers.

Another problem is that they don’t let your website send emails on its own, so you have to use extra software or plugins from outside, which can be expensive and take up time. Just something to keep in mind when choosing a hosting provider.

Verdict: Making the Right Hosting Choice for 2024

In the landscape of shared hosting services, where we’ve found most providers to be quite similar, GoDaddy stands out as an exception in 2024. When simplicity and cost-effectiveness are key, GoDaddy’s limitations become apparent. The inability to install a free SSL certificate, coupled with high charges for their own SSL certificates, could impact your budget. Moreover, the restriction on sending emails directly from your website adds an extra layer of complexity, requiring third-party solutions that might incur additional costs and time.

Considering these drawbacks, especially for users looking for straightforward and economical hosting solutions, it’s advisable to explore alternatives like Bluehost or HostGator. These providers offer reliable performance, user-friendly interfaces, and the essential features needed for a seamless online journey. Remember, the right hosting choice ensures your website not only thrives but does so without unnecessary hurdles. Choose wisely for a hassle-free and cost-effective hosting experience in 2024.

Looking for Expert Assistance?

Do you need guidance in selecting the best service, setting up your server, debugging or fixing your site, or enhancing your site’s speed and SEO? Our team is here to help! Fill out the form below, and let’s embark on optimizing your online presence.

How can we help?

Hidden

Next Steps: Sync an Email Add-On

To get the most out of your form, we suggest that you sync this form with an email add-on. To learn more about your email add-on options, visit the following page: (https://www.gravityforms.com/the-8-best-email-plugins-for-wordpress-in-2020). Important: Delete this tip before you publish the form.
Name(Required)
This field is for validation purposes and should be left unchanged.
https://geekycodelab.com/wp-content/uploads/2024/02/hosting-hero.jpg 430 1500 Kaveh Movahedi https://geekycodelab.com/wp-content/uploads/2024/07/logo-transparent.png Kaveh Movahedi2024-02-03 21:21:442024-11-02 20:54:59Best Hosting for Your Blog or Online Business in 2024

Connect With GCL

Phone
WhatsApp
Email

Services

Digital Marketing
Website Development
WordPress Websites
Mobile App Development
UI/UX Design
Graphic Design

Free Resources

Blog
Guides
Newsletter

Team

About us
Contact us

  • Link to X
  • Link to WhatsApp
  • Link to Instagram

Scroll to top